
Lens Lookout
This feature is available with Standard and Enterprise plans.
Overview
With Lens Lookout, we’re putting the power of automated monitoring squarely in your hands. Lens Lookout is designed to revolutionize the way you safeguard and steward your land by providing a new way for you to continuously scan your land and detect changes based on the criteria you care about. This feature includes two preset options so you can look out for vegetation drops and changes in parcel ownership, as well as the ability to set up new Lookouts based on your own criteria. Let Lens Lookout do the tedious work of combing through datasets and identifying changes on your properties for you!
- Create a Lookout policy
- Lookout policies for category datasets
- How Lookout works
- Reviewing change notifications
- Use cases and inspiration
Create a Lookout policy
Your first step is to enable a policy so Lens can start monitoring for you in the background. We recommend enabling one or both of the preset policies to detect unseasonal vegetation drops and changes in parcel ownership. You can also create a policy based on the criteria you care about. To get started with creating your own custom policy, open the Lookout option on the left of the map view, then click “+ Create a policy”. For example, you may want to create a lookout policy for changes such as:
- Vegetation growth above a threshold in an area recovering from a fire
- Surface water above a threshold in an area at-risk of floods
- Chlorophyll on a body of water to respond to possible algal bloom events swiftly
All of the thresholds are customizable, meaning that you are able to set them based on the local conditions in your geographical area, or adjust them over time.

Lookout policies are set at the portfolio level, and you’ll be able to select from any datasets you’ve added from the Lens Library. Datasets from the Lens Library can be added to portfolios at any time, but a dataset must first be added before you can create a lookout policy for that data.
Choose dataset
When creating a custom Lookout policy, the first step is to select the dataset you want to use:

Set spatial rules
Next, you'll set spatial rules. In this example using the Vegetation (S2) dataset, we'd like to know when regrowth happens in an area that was previously logged. We're setting this policy to only monitor within an overlay that covers the harvest area. You can also specify a percentage of your property or a minimum area size of change to monitor for.

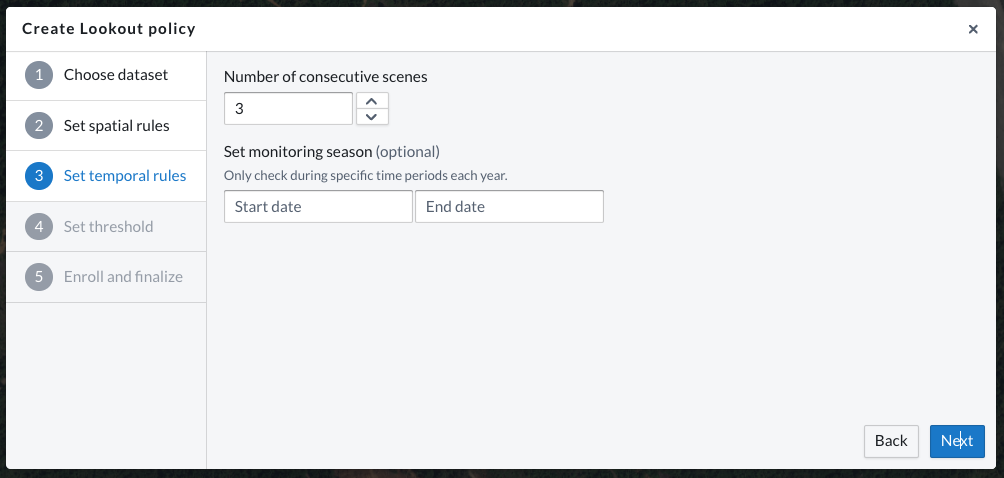
Set temporal rules
After that, you'll decide how many scenes with data that meet your thresholds are necessary before triggering an alert.
For the "Number of consecutive scenes" field, our typical recommendation is three consecutive scenes to help reduce potential false positives. Setting a lower number of consecutive scenes will make your policy more sensitive and are more helpful for cases where changes are short-lived, like a flood.
In the "Set monitoring season" field, you can decide if this policy should run during a specific time of year -- perhaps there's a specific time of year where certain activities are more likely to happen (i.e. fire season, harvests). If you set a monitoring season of June 1 - October 1, your policy will automatically run during that window of time each year. The policy will only screen for new alerts during the time window you set. So, if you have set the number of consecutive scenes to 3 and a monitoring season beginning June 1, the first alert you could possibly receive would be on the third sensing after June 1.
 Set threshold
 Set threshold
During this stage, you'll preview real data for the property you're working on to help you determine an appropriate threshold for your policy. For our policy to monitor regrowth, we're setting a mid-range threshold value on the scale (0.6) with the goal of catching vegetation regrowth before it reaches maturity. Because this property experiences seasonal leaf-off and green-up, we're looking to set a threshold that's high enough to avoid some of that noise. This chart preview provides helpful information on the average value across the entire property, but please note that it not take the area threshold for the policy into account. Therefore, small portions of your property could be much higher or lower than the average and trigger more alerts than the chart suggests.
 Enroll and finalize
 Enroll and finalize
The final step is to enroll properties that should be monitored by this policy. This step is flexible -- more properties, or the entire portfolio, can be enrolled after completing this step.

Lookout policies for category datasets
Custom Lookout policies can also be created for category datasets like Landcover and Global Forest Loss. With these Lookout policies, you can select changes to specific categories you're interested in, or select "Any" from the dropdown to receive notifications about changes to any of the categories moving forward.

How it works
Beginning when your Lookout is created, our machine learning model will begin reviewing data as soon as it becomes available to look for any changes. We are processing every new scene as it becomes available, starting from the moment you enroll a property. Each scene for the selected dataset will be reviewed based on the criteria you set, including threshold values, percentage of the property, number of scenes, and more.
Depending on the dataset selected, the frequency of new data will vary. For example, if your lookout policy is based on data from Sentinel-2, new data will be captured about every 5 days. On the other hand, a modeled dataset may be updated less often, such as the Planet Forest Carbon Diligence data. Either way, as soon as new data is available, we’ll check it against your criteria and let you know if a change occurred.
For threshold policies (non-categorical), you will be notified for the first scene that fulfills all of your policy requirements. If subsequent scenes continue to meet the threshold you set, you will not continue to receive alerts -- this is done to reduce noise. You will be alerted again if there is at least one scene where the threshold is no longer set prior to your Lookout policy requirements being met.
Reviewing change notifications
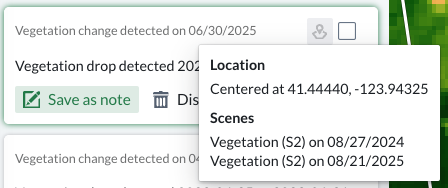
If your threshold conditions are met, a new notification will be created in Lens and emailed to you. You can review these in Lens from the Lookout pane. The notification preview will include the policy name and the scene date when the change was detected; hover over the location icon to see more details of the change notification.
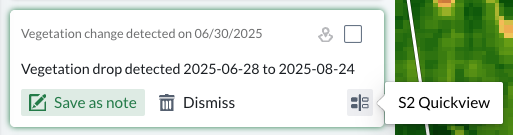
Each notification will also append the data from the latest data scene, and the area of change will be outlined. From there, you can save those notifications as Notes, compare the dataset to true color imagery, plan to make an in-person visit, or follow up in any other way you see fit! If you dismiss the notification, you will not receive further alerts unless the property conditions first fall below and then meet the threshold criteria again.

To quickly toggle between datasets when reviewing a Lookout notification, click the S2 Quickview button after hovering your cursor over a notification card. We recommend starting by reviewing Truecolor S2 data, and then reviewing any other datasets that may be relevant for the geography you're monitoring.
Curious about use cases or looking for some inspiration to get started? We've got you covered:
- You're monitoring an area where planting is occurring, like reforestation or an agricultural field, and want to know when growth is happening. Set a Lookout using S2 Vegetation data for above a certain threshold.
- You'd like to keep an eye on potential flooding or changes in water presence on your land. Set a Lookout using S2 Surface Water or S2 Surface Moisture data for above a certain threshold.
- You're monitoring a body of water where algal bloom events are a concern. Use S2 Chlorophyll data with a Lookout set to above a certain threshold.
- You're monitoring a forested area and what to know when spring leaf-out occurs. Use S2 Vegetation data with a Lookout set to above a certain threshold.
- You're monitoring an area that's prone to severe weather or strong storms and want to know if there's damage to vegetation on the property. Use S2 Enhanced Vegetation or S2 Vegetation data for below a certain threshold.
- You're keeping an eye on a vegetated area and want to know if there's a subtle decline in vegetation vigor which could signal degradation from a pest, pathogen, or temperature stress. Use a Lookout set to monitor S2 Enhanced Vegetation below a certain threshold.
- You're monitoring a winter sports recreation area and want to know when the first snowfall occurs or covers a certain percentage of your property. Use a Lookout set to notify you when S2 Snow data exceeds a certain threshold.
- You're monitoring a wetland and want to know if water or moisture levels decrease during a dry spell. Set a Lookout policy to notify you if S2 Surface Moisture dips below a certain threshold.
- So many more!