
Ordering high resolution imagery
This article covers:
- Ordering imagery from the property page
- Ordering partial imagery
- Ordering imagery from the portfolio page
- Hiding images
- Spatial resolution considerations
- Timing considerations
How to order imagery and data in Lens
Lens allows you to easily order high-resolution, Truecolor imagery and data from a variety of aerial vendors. There are two ways to order imagery in Lens: from the Property Map View, or from the Property Overview Page.
Ordering imagery from the property page
To order imagery from the property map view, select “Order” from the left sidebar, and you’ll see a list of all the available options for your property.

From here, you can also use the sort and filter buttons at the top of the Order pane. You might want to choose the most recently captured image to get an up-to-date understanding of property conditions, for example, or one captured in the late fall for leaf-off imagery that allows you to see what’s happening under the canopy more clearly.
After you’ve found an image that you’re interested in ordering, select “Preview” for any of these images to see more details, including cloud coverage, costs, and a thumbnail preview of the area. This is a good time to make sure this image will meet your needs. Once you select “Order Image,” processing will begin so that you can view the full resolution image in Lens. Note that only users with the Admin role can order imagery.
For more guidance on ordering imagery from the Airbus Extended Archive, please see this article.
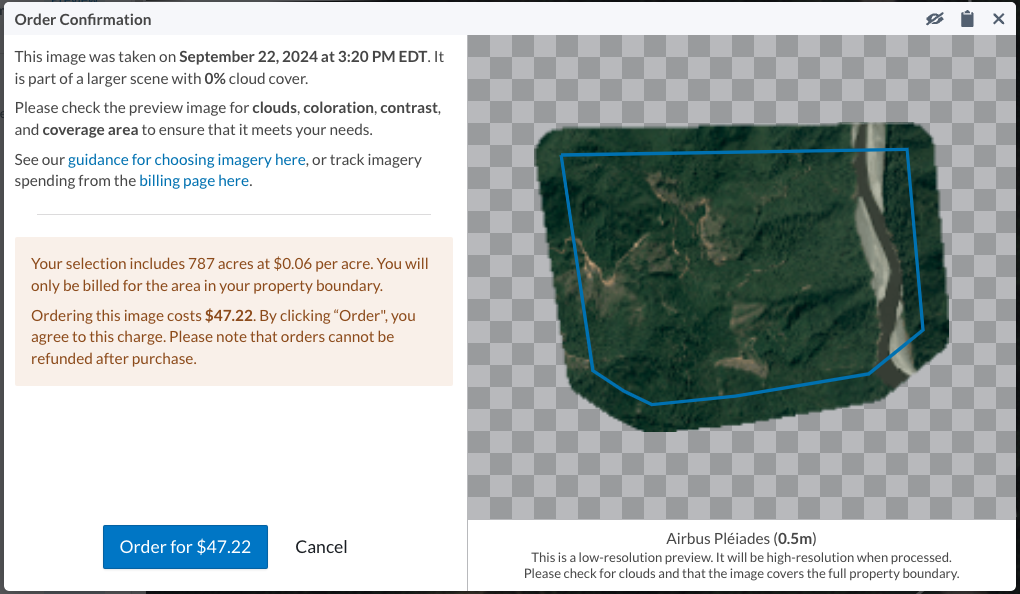
By default, we process high-resolution imagery thumbnails back to the beginning of the prior year. If you are using Lens for baselines or need to order imagery from earlier time periods, please reach out to us.
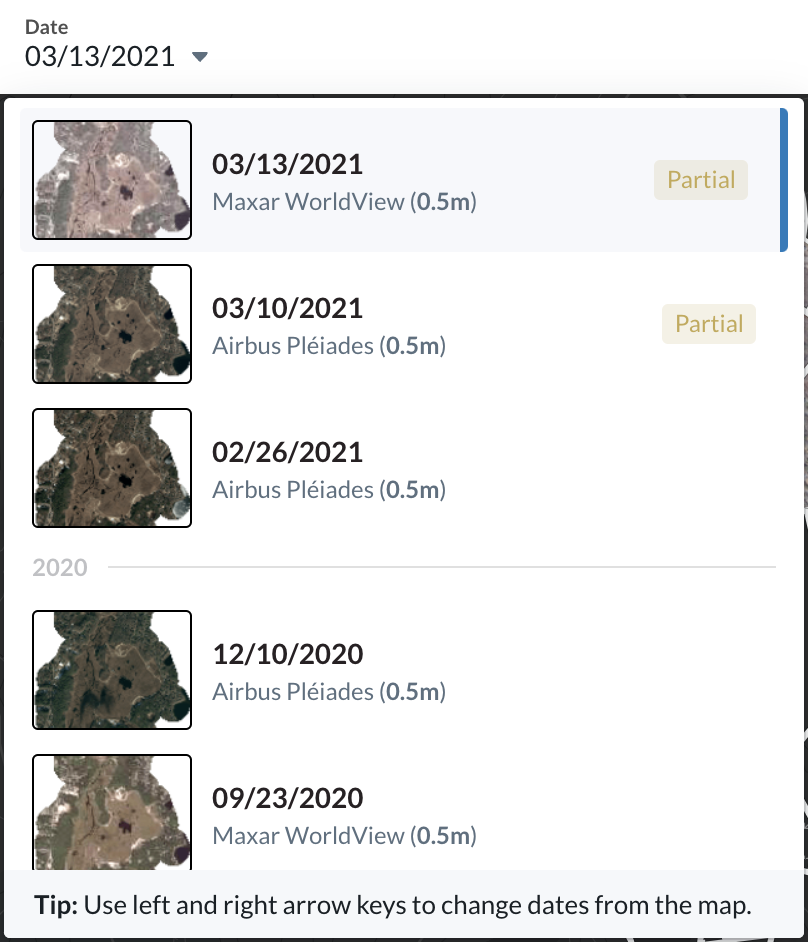
In some cases, you may see imagery that partially covers your property. These areas are marked in red on the preview map. We make these images available to you as additional options for ordering, as the covered area may cover what you're hoping to see. You won't be charged for uncovered portions of image, and you can use the Order Partial Imagery tool to order a covered subsection of at least 10 acres.

Ordering partial areas
If you’re interested in ordering imagery or data for only a part of a property, you can use the Order Partial Area feature. This can be ideal for follow-up, strategically spending budget on larger properties, or even checking to see if imagery or data meets your needs before purchasing the entire scene.
From the Order pane on the left, you’ll see an icon for “Order Partial Imagery” where you can draw a rectangle on the map of your property to indicate where you need imagery or data, as shown below.
There is a 10 acre (4 hectare) minimum for partial area ordering, and once you draw a rectangle you'll be able to see if it’s large enough or adjust. Once your selection meets these requirements, you’ll see the options for imagery and data that overlaps with your selection and be able to order for only that part of the scene. Any scenes that don’t overlap with your selection will be greyed out from the list of orderable options.

For partial area ordering, the selection you choose is exactly what we will process, unlike ordering a full scene where we include buffers automatically. If you select an area to order that falls within the buffer zone of the property, you'll only be charged for acreage within the property boundary.
After a partial scene has been ordered, you’ll see a gold “Partial” label on the date dropdown and in the Order pane.
You can always go back and order more imagery or data from that same scene, or select it in the Order list and “Order Rest of Image” to complete the scene.

Ordering imagery from the portfolio page
It’s also possible to order images directly from the list of properties in your portfolio page, which can be helpful if you’re ready to order imagery for multiple properties. Navigate to the “High-Res for [Year]” column and hover to see what images have been captured for each property. A list of available images and dates will pop up, and you can select “Show Imagery” to view those thumbnails, preview, and order.
This can also be a helpful approach for multi-location properties which include more than one individual part. Each part is listed beneath the overall property name in the property overview, and imagery is ordered separately for each individual part.


Hiding images
If there are images that do not suit your needs, they can be hidden from the list of available imagery. Open the available images from within the property or from the portfolio page. Click on the "Hide this image" button to hide it from the list of available imagery.

To view any hidden imagery, select the "Show hidden scenes" option in the filter menu on a property page.

Spatial resolution considerations
Having a variety of options means greater coverage for each of your properties, but it can sometimes be difficult to determine what spatial resolution is sufficient for various monitoring purposes. Spatial resolution refers to the size of the smallest feature that’s visible in an image. So when we refer to a 0.5-meter resolution image in Lens, that means that one pixel in the image corresponds to a half meter by half meter area on the ground. The chart below allows you to compare various spatial resolutions for different property sizes to give you a sense of how detailed the image will be.

The image below shows the size on the ground of a single pixel for different resolutions. Check out this blog post on pixel resolution for some more information.

Imagery from Lens, U.S. Department of Agriculture, Farm Service Agency
The Nature Conservancy released a white paper in the fall of 2020 entitled " Remote Property Monitoring at The Nature Conservancy in California" about their experience navigating different remote monitoring options. They developed a table with guidance on what level of spatial resolution is needed to detect various types of changes on conservation easements. The table provides examples of permitted or prohibited uses and activities, and their findings for the minimum spatial resolution required to detect various changes for reference.

Timing considerations
- Leaf-off (Spring/Fall): In areas with dense deciduous forests, ordering imagery before spring leaf-out or after fall leaf-drop provides a clearer view of structures, vehicle tracks, or activities hidden beneath the canopy.
- Peak-leaf (Summer): Forestry work and tree removal are most easily identified during the height of the growing season, as any new voids in vegetation create a sharp contrast against the surrounding healthy canopy.
- Monitoring Growth: You can use the Sentinel-2 Vegetation layer in Lens to track the exact timing of leaf-out and leaf-off on your property to plan your orders effectively.
- Time of Day: Check the capture time during your preview. Images taken late in the day, particularly during late-year captures in the northern hemisphere, will have longer shadows from trees and buildings.
- Advantage vs. Distraction: While long shadows can sometimes be distracting, they can also be helpful—for example, a shadow can help you spot a small shed in a flat, snow-covered field where it might otherwise blend in.
For more guidance on how often and when imagery becomes available, check out our article here.